Planning a project well will help you steer the ship for the full duration of the project. Although it might be tempting due to expediency for a project manager to think through the steps needed to achieve the project's goal on their own, planning is definitely a team sport, and gaining input and understanding from the larger project team will be helpful. The project roadmap will be paved with high level summary tasks that can be broken down a bit into smaller child chunks of work with start and finish dates, which can optionally be grouped together into sections. And you can attach related files to help further flesh out the project.
Layout the Project Structure
You can divide your tasks into separate sections (aka phases) if you wish, to have them mimic the flow of your projects. Here is an example of what a task list divided into sections looks like:

To create sections for your task list, from inside the project site, click on the ellipses within the Create New Task button - this will expose the Create New Section option:

Add Tasks
To add new tasks, you have three options:
- Click directly into the row at the bottom of your task list (or the bottom of any task section), and begin typing directly inline of the row labeled "Type New Task Name Here..."
- Click Create New Task at the top of the screen, which will open the Task Side Panel and allow you to create a task either in the section you had last clicked into, or at the bottom of the entire task list if you did not yet click into a section when first visiting the Tasks page. To close the Task Side Panel, click anywhere outside the panel.
- Copy multiple tasks from a spreadsheet column and paste them all into a Project Central task list simultaneously. After initiating the paste into a single cell in Project Central you'll be presented with an option to create separate tasks.


Duplicate a Task
Project Managers have the ability to quickly duplicate a single task with a choice of task details. This is a very convenient way of creating a duplicate of any one task, so you can save time creating tasks with no need to input the same details entered previously.
To duplicate a single task:
- Click Options in the Task Side Panel of a task in the Task List or the My Tasks screen, and then click Duplicate Task.

- The task will be duplicated with the original title plus a number appended to the end. Choose the task details to copy.
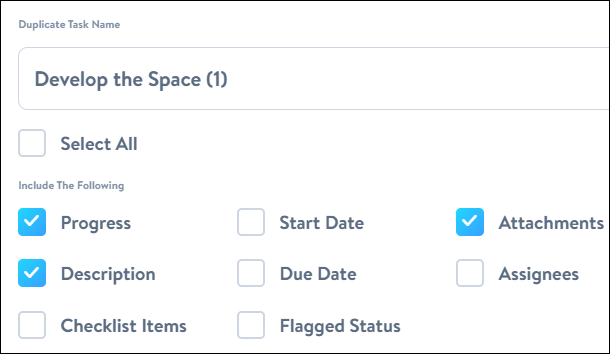
- The copied task will automatically get placed beneath the original task.


Assignee Notification of Duplicated Tasks
If the user duplicating the task chooses to include assignees, all these assignees will receive the standard task assignment notification when the task is successfully duplicated.
Delete a Task
To delete a task, click into the Task Side Panel > Options > Delete Task

Add Dates to Tasks
When creating a new task, or anytime after, you can add a Start Date and Due Date by either clicking directly inline on the date field in the task's row, or by opening up the full task window by clicking to the right of the task name in the row. Choose the appropriate dates from the dual date picker.

Assign Tasks to Team Members
When ready to assign team members to tasks, this is easily accomplished by either clicking directly inline on the Assigned To field in the task's row, or by opening up the full task window by clicking to the right of the task name in the row. Choose an existing member of the project team, or add a new member by searching through your Active Directory in the All Users tab (for private projects the All Users tab will not be displayed).

When assigning a task in the Task Side Panel (not directly in the Task List) you can easily Select All team members simultaneously.

The relevant users will be notified via email after the check button has been clicked to finalize the assignment.
View the Schedule on a Gantt Chart
When ready to take a step back and look at the schedule in a more holistic, calendar view, use the built in Gantt Chart functionality, accessed with the Gantt button along the top of your project (you can expand and collapse sections as needed). Here you can also adjust the schedule easily by moving tasks and dates directly in the Gantt.

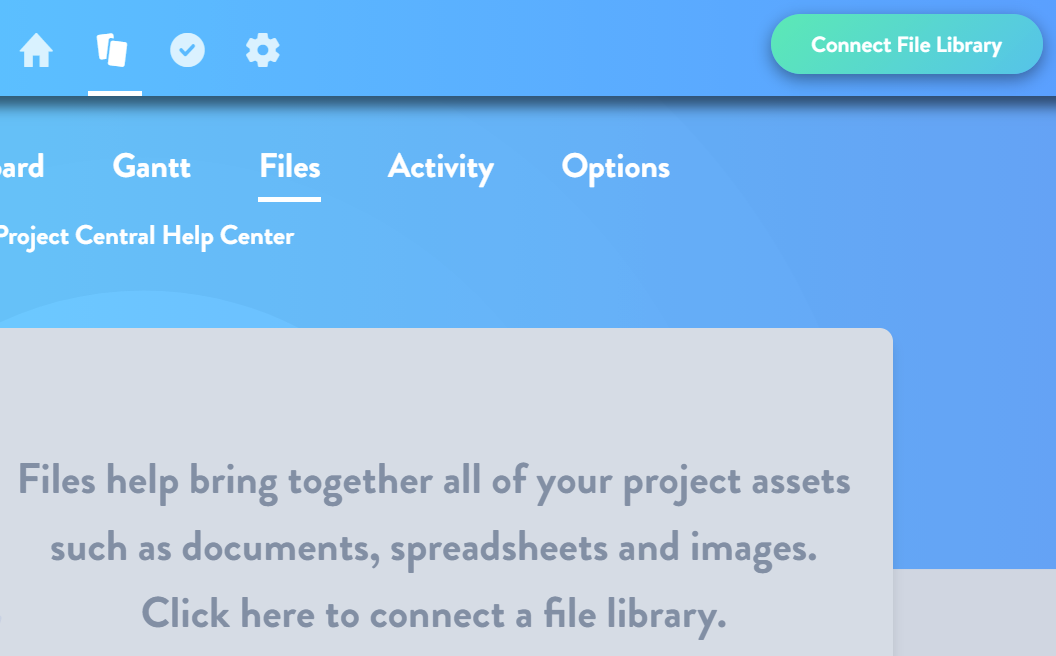
Add Files to a Project
You can add or connect to Files in order to store all your project collateral and deliverables in one secure place:

Connect a SharePoint File Library
In order to associate files with your project, you will first need to connect the project to a Microsoft 365 SharePoint document library.
- Find the Files link at the top of your project and click into the box below it, or the Connect File Library button towards the top:
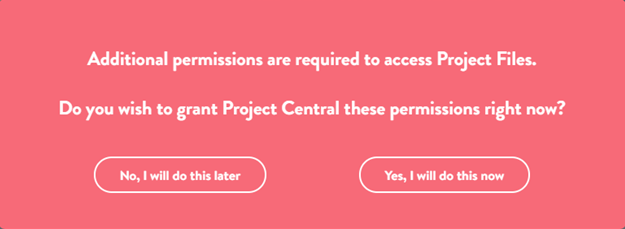
- When you click on the files tab for the first time in Project Central in order to connect your SharePoint document libraries, you'll be asked for confirmation before proceeding:
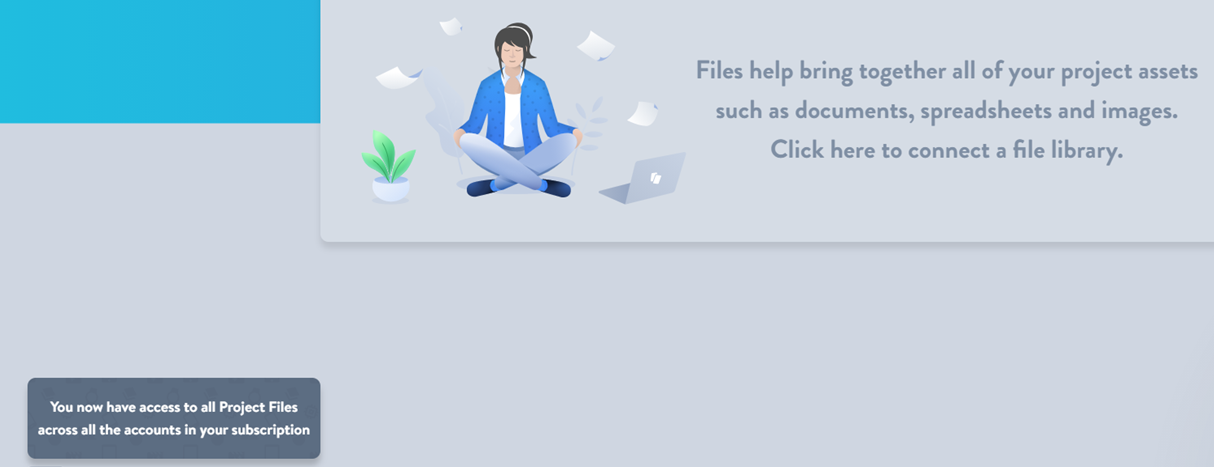
- Upon successful connection to your SharePoint files you'll be presented with a confirmation message:
- Next you'll be presented with an option to either search for all SharePoint sites that your Microsoft 365 credentials are linked to (from which you can then link to an associated document library), or to paste a direct URL link to a specific document library to which you have access:

- If you choose to Search Sites, after choosing a specific site you will then have the option to connect to a specific folder, or to the top of the document library hierarchy from which you can later open any child folders you have permission to access.


This process does not actually copy any files directly into your project site, but rather creates a link to your Microsoft 365 hosted SharePoint document library.
You can disconnect the link to a document library at any time by clicking on Configure Files:
